Well, I'm about to do all of you a huge favor! As any of you who know my mom knows, she is a very talented woman. Many of you have been recipients of her talent. Well, I really wanted her to teach me how to make her car seat cover with a window so that I could make one for my friend. She cautioned me about this. She said, "As soon as you make one you will be asked to make more and more." They really are that amazing! And everyone wants to know where they can buy one, or if she'll make one for someone they love. SO... I decided that I would make this one, and document the whole thing so that I could blog her instructions. NOW YOU ALL CAN MAKE YOUR OWN! You're welcome!!!
1. Start with 1 ¼” yard of fabric
for the front of your car seat cover, and 1 ¼” yard of fabric for
the back of your car seat cover. Long side of cover is 42” and
short side is 36”.
2. Measure in 12.5”. on the left
side, the middle, and the right side and mark with a dot. Do this on
the bottom as well. Do this on both pieces of fabric.
3. Draw a line connecting the dots
4.Cut down each line and label on
the end of each piece of fabric, the sides and the middle so that
you can keep them straight.
(proof that yours truly really did work on this thing)
5.Get out your “Clear Double
Polished Clear Vinyl”from Walmart. Cut out 12” by 12” for the
window.
6. Take 2 middle pieces and put them
together face together. Measure down 20” and cut fabric. Label the
top of the fabric and the bottom
7. Warning, plastic slips, you cant
use a pin because it'll ruin the plastic. Put the plastic in between
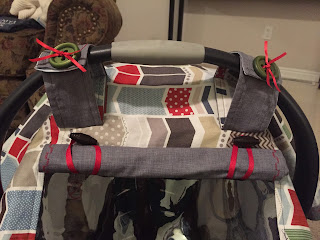
two fabrics, face in. Sew ¾” in. Make sure plastic and material
don't slip.
8. Get iron out. Put heat on silk
synthetic setting so its not as hot. CAUTION! Getting the iron too
close to the plastic will melt/bubble it. Open up fabric to right
sides and iron open seam. Iron both sides.
9. Back to sewing machine. Line
presser foot up to material and top stitch all the way down.
10. Take middle bottom pieces, put
together face in. Measure down 12” and cut. This piece will be the
flap/cover.
(the master herself, isn't she cute?)
11. Place fabric face down on plastic
(make sure right piece is on top) on both sides. Repeat steps 6-8
12. On to the sides. Place top fabric
face down on top fabric. And bottom fabric face up on bottom fabric.
Beauty here is you can pin the fabric. Make sure you get all 4
pieces lined up.
13.Sew 3/4” in. Liken to step 7.
14. Repeat step 8
15. You are also going to kinda repeat
step 9, but only around the window.
16.Repeat steps 12-15
17. There will be bottom excess on you
side pieces. Cut those off and they will be your straps (or you can
buy extra fabric)
18. Now we are going to bind the
edges. Fold your sides in 3/4” and then roll it so that it
measures 1”. Pin this all the way around. HINT, start in the
middle and work your way out. IN the corners, fold until it looks
right. Refer to pic, and then IRON ALL OF IT. Then you will top
stitch around. You can do a decorative stitch here if you want.
19. STRAPS. Put pieces together. Faces
together. Measure and sew along side of presser foot. Sew 3 sides
(they wont be all the way even, so sew measuring to the smaller
piece). Clip off the corners and turn inside out. Fold 4
th
side inwards so that it makes a clean 4
th side. You'll
iron the strap at this point. Then do a top stitch all the way
around.
20. Flap/Cover: Follow step 19
(straps)
21. Straps. Cut Velcro to fit width of
strap. We turned our strap to the inside so our fabrics contrast.
Sew Velcro square onto strap. Pay attention because 2
nd
part of Velcro is sewed square onto other side of fabric. See pic.
DONT SEW THESE ON TO THE ACTUAL CAR SEAT COVER UNTIL YOU CAN MEASURE
IT TO YOUR CAR SEAT. You can put cute button on there too (or, for
girls, a Big Bow). When doing second strap, make sure you are sewing
Velcro on the same way you did the first strap.
21. The longer fabric side is the top,
so that it can drape over the car seat.
22. Straps will be sewed about in the
middle, depending on the car seat
23. We used ribbon as the holder of
the flap/cover. Cut the ribbon 8”. Loop ribbon on both sides (2”
from corner) and pin overlapping. Put the flap over the top, lining
the top of the window. Sew across the top, using the footer as your
guide.
24. You can add a few different things to the finishing touch. This is what I decided to do.


No comments:
Post a Comment